A simple quilt in one day… really?
Hi Creative Mamas! I am so excited to show you how I make a little simple quilt in one day! YES, one day! Super easy and super simple! Quilting is a great way to use all those fabric scraps that you may have from older projects.
In my case I love using quilting in combination with my natural dyeing practice. There is something so beautiful about putting all those naturally dyed fabrics together in a quilt. I also love combining the natural dyed colors with old repurposed fabric such as old clothes from the kids or old linen etc.
Typically a quilt will have a top layer which can be a plain fabric or it can be a completed piece of patchwork, embroidery or applique. It will have a bottom layer, backing or lining, which traditionally would have been an utilitarian fabric such a calico.

This post contains affiliate links, which means I receive a small commission, at no extra cost to you, if you make a purchase using the links. Please see my disclosure for more details.
The filling is called wadding or batting, which can be from synthetic or natural fibers and it comes in different thicknesses. I like to use old blankets but always be sure that whatever you use its even in its surface.
I love quilting because it can be the way to bring embroidery, patchwork and applique together. Armed with my sewing machine I feel the sky is the limit when it comes to quilting
For this project I will show you how to make your own quilt pattern based on my take of the traditional patchwork log cabin design and I will be using patchwork and embroidery in combination with quilting. I will also use a sewing machine to patchwork and hand sewing to quilt.
How to make a quilt pattern?
I love creating my own patterns when it comes to embroidery and quilting. My creative process usually starts with creating my own colors through natural dyeing and then I start thinking about ways to use these beautifully colored fabrics and yarns.
So, creating patterns allows me to be a bit more creative and to achieve more exciting results. Based on the traditional patchwork Log Cabin Design I developed this little pattern which is free for you to download.
However, I wanted to share the process of how I developed the pattern for you to use this method if you wish to.
Materials:
You will need a good sewing machine
- Fabric of your choice for patchwork
- Fabric of your choice for backing
- Wadding/Batting
- Threads and yarn for embroidery and hand quilting
Log cabin block Pattern
The first thing you need to do is gather the fabric that you wish to use. This is flipping the usual process upside down but that’s why it’s so cool. We start with the fabric and we adapt the pattern to it. We will make the traditional Log Cabin block.
Grab a piece of paper. Ideally you want an A3 size paper. If you only have A4 size paper ( which is regular print size) you can use two pages and place them side by side. Glue them together by slightly overlapping them and using regular glue or scotch tape.
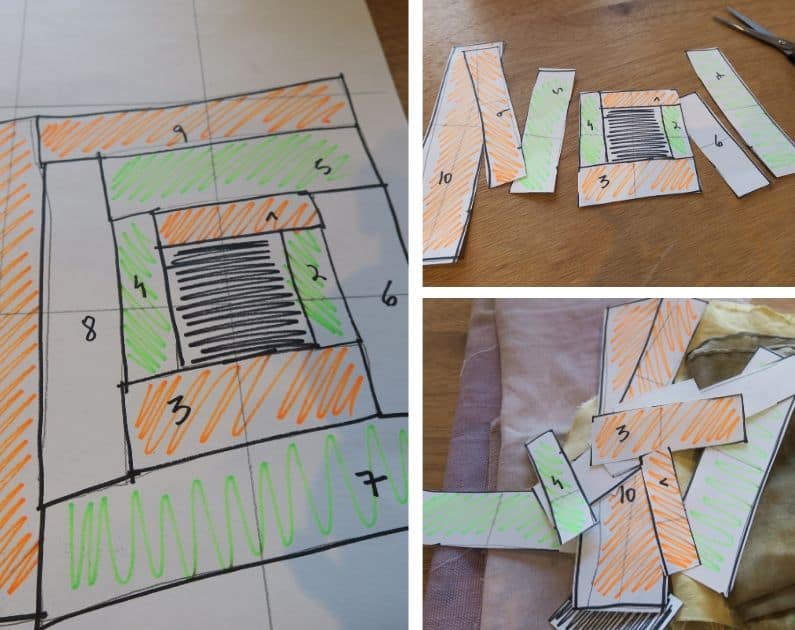
Divide the space into 9 equal squares by drawing 4 intersecting straight guide lines with pencil (2 horizontal and 2 vertical) .
Using a black sharpie draw a square/rectangle touching two of the intersecting lines of the grid as shown in illustration below.
Continue by drawing rows which will get bigger and bigger as you go around the square. My final quilt pattern ended up being 8 inches (20 cms) by 12 inches (30 cms). This is the starting point. You can always add more strips to make it bigger when you reach the sewing stage.

With your different fabrics in mind start identifying the pattern pieces with the fabric color you want to use for that particular block. In other words you are color coding your pattern. All the orange sharpies will be cut in the yellow fabric and all the black sharpies will be cut in the purple fabric and so on.
This step is helpful because it allows you to determine the flow of colors that you will be using and it will avoid two blocks being the same color.
Cut the different sections of the patterns. You will end up with a bunch of little pattern pieces in different sharpie colors. I also added numbers to remind me of the flow but you don’t need to do that.
You can make your own pattern or you can use the pattern provided.
Download your Free Quilt Pattern and sewing sequence plus get access to my Resource Library
How to make a simple quilt in one day Tutorial
Step 1:
Choose your fabrics and cut your strips. Initially I chose 3 different silks and a piece of cotton. They were naturally dyed with Eucalyptus, Cochineal and Logwood. As the quilt progressed I added a few more fabrics and also used naturally dyed threads and yarn to hand embroider.
Cut around the pattern pieces making sure to leave seam allowances on all sides (1/4″). You can use a rotary cutter or your fabric scissors.

Step 2:
Place right sides together and sew the center square/rectangle to one strip of fabric using 1/4″ seam. Press toward the darker fabric. Repeat this process going around the center square/rectangle and following the flow of your pattern.
I have created a free downloadable PDF of the sewing sequence for your reference and guide just to make life easier.

Note: Because I am using fabric scraps some of my strips are made up from different pieces previously sewn together. You can do this at the beginning by preparing your strips from scraps. I am also sewing my seams in a not so straight line and this is on purpose.
I like my quilts and my embroidery to have that rustic look, the handmade print, so I do this a lot. But it’s up to you to take this on board or to simply follow a straight line while sewing.
Download the quilt sewing sequence plus get access to my Resource Library by completing the form above.
Step 3:
Keep adding rows around the center square for as long as you wish. The pattern provided has only 7 pieces but I actually kept adding strips of fabric to my quilt until it grew to 20′” (51 cms) by 17″(43 cms).

Make it as little or as big as you feel it should be. Go with the flow.
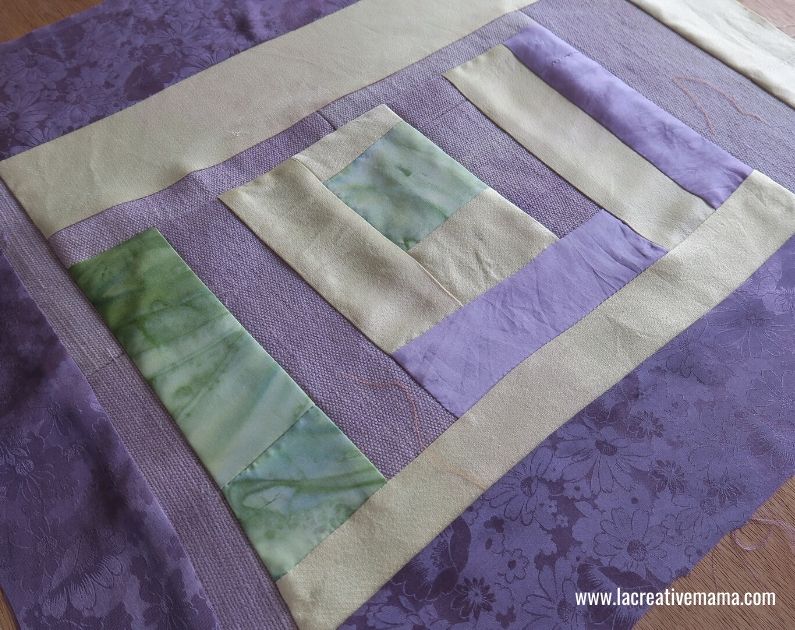
I want to show you how the underside of the quilt looks after I have finished my patchwork. Always remember to press as you go. My rule of thumb is to press toward the darker fabric but sometimes you may have a thicker fabric and you may need to press the opposite way. Feel free to judge this case by case.

Step 4:
It’s time to choose the quilting threads, the batting or wadding and the backing fabric. I have found a beautiful linen in my scrap stash so I will be using that for the back of my quilt and will use my naturally dyed cotton threads and silk/wool yarns to quilt by hand.

Place the backing fabric on the table. Place the batting/wadding on top and place the patchwork piece of fabric on the top layer. Start the quilting process by hand sewing through the layers.
I have chosen a combination of running stitch, cross stitch, lazy daisys and french knots. Check out the basic embroidery stitches here.
Since I am using naturally dyed silk I decided to use yarn that was dyed by hand using the same natural dyes.
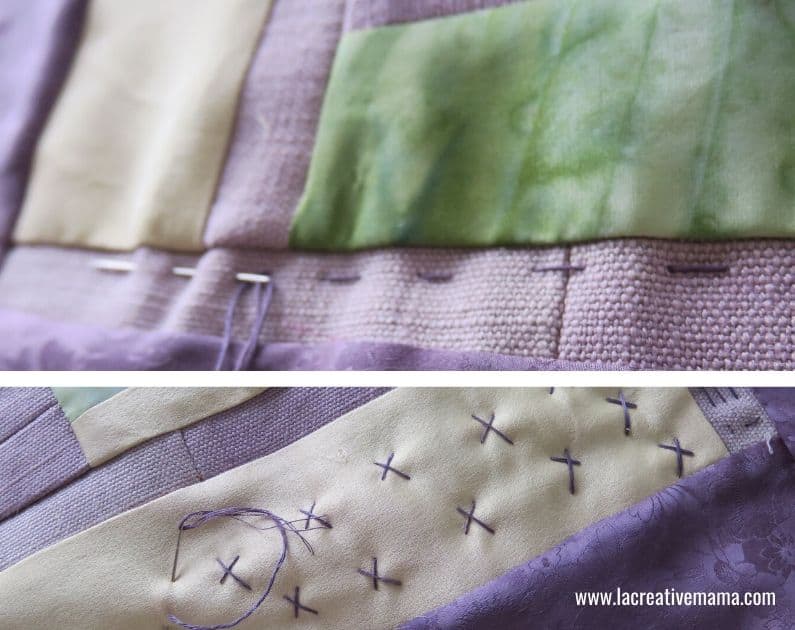
The more hand embroidery that you do on a quilt the more texture it will have. I like to use running stitches because it creates a wave on the fabric as shown on the photo below.

This is how I made this beautiful simple quilt in one day. It’s such a fun and an intuitive process that its the best therapy out there! Craft Therapy indeed.

You can carry on embellishing with decorative embroidery stitches as much as you want and you can finish the quilt with a bias binding or you can turn it into a pillow.

A little video demo of how I hand quilt
I hope you have enjoyed this tutorial! Check out this post for another super fun log cabin project tutorial.
More fun quilting projects:
How to make a baby pillow cover tutorial