Hi Creative Mamas! I have decided to write this post about the different ways of how to applique, so that you can have a guide of the different effects that you can achieve by choosing one applique technique over another.
In the The Beginners Guide to Sewing Crafts, I shared my love for the different way to practice creative sewing such as Quilting, Embroidery, Patchwork, Fabric collage and Applique.
What I didn’t share is that Applique is my absolute favorite and the technique that I love using the most.
If you’re new to the world of fabric applique, I know this can be an overwhelming and intimidating process. But don’t worry! I am here to help!
In this Beginner’s Guide to Fabric Applique, you’ll find tons of information on what it is and why it’s such a great way for everyone from beginners all the way up through experts in sewing skill sets to make use of their fabric scraps while making something beautiful at the same time.

Not only that – there are so many different ways (with or without fusible web) that your creativity will never run out with this technique.
So grab your scissors, needles, pins and thread because today we’re going over how easy it is for you to discover the joy of fabric applique and how you can create your own beautiful pieces without being intimidated by it.
Because after all, it’s just fun! Fabric Appliqué is just a way to make use of scraps by adding one or many shapes to another piece of fabric.
You can applique and then embroider on top of the appliqued shape to further embellish your shapes. You can applique by hand or by machine, the results are both beautiful and super satisfying!
What kind of fabric do you need for applique?
The best fabrics to use for applique projects are small pieces that measure no more than 12 inches square. These pieces are also called “fabric scraps”.
I like to stick with natural fibers such as 100% cotton fabric, muslin, linen, silk or 100% wool fabric.
I love to repurpose old woolen blankets into appliques because I can also naturally dye them.
The photo below is a variety of silk and wool fabric and yarn scraps that I dyed using natural dyes such as cochineal, onion skins, eucalyptus and modifying the color further with iron water.

Other materials include:
- Embroidery floss (you can use any colors)
- Sewing machine
- Hand sewing needles
- Threads in different colors (I like to use my naturally dyed yarn and cotton threads)
- Scissors – I like to use embroidery scissors for my applique work, but you don’t need anything fancy to get started with.
- Rotary cutter and cutting mat
- Fabric marker or pencil for marking your fabrics.
- Applique Templates (available …)
- Fusible web (I always use this brand)
- Ironing board
- Iron
- Ruler for measuring fabrics and scraps
What does applique mean?
Applique is a form of needlework where pieces of fabric are cut into shapes, and then sewn onto another piece of fabric. Very similar to fabric collage in the sense that you can create it as you go.
It can be a very creative exercise and you can develop your designs and templates as you are sewing your piece.
What is applique used for?
Applique is mostly used for quilting, clothing and home décor items.
In my creative sewing practice I use applique to create a unique look on small items such as tote bags, book covers, fabric books, embroidery patches, pillows and cushions or even Christmas Advent Calendars.
Applique allows me to work fast (which I love) because it also allows me to make mistakes and correct them. Even though there are no mistakes when it comes to creative sewing!

Why is applique environmentally friendly?
Applique is a great way of making use of scraps and leftovers. You can have fun collecting small pieces of fabric leftover and you can also over dye them with natural dyes or give them a vintage look.
You can truly transform them into something beautiful! Applique is my GO TO craft technique for upcycling old fabrics.
Knowing how to do applique will allow you to mix and match different techniques to create unique looking pieces that stand out!
You can transform your fabric scraps by over dyeing them and create a vintage look before you sew them into a quilted piece as well 🙂
Applique Templates
You can download your FREE Applique template from La Creative Mama by completing the form below. Experiment with the different ways in which you can applique the same template by following all the different methods outlined in this Applique Beginners Guide.
Creative ways to sew appliques
Applique is a great way to use fabric scraps and transform them into unique looking handmade crafts.
I like using the applique technique in different ways and I love creating unique looking pieces. You can also use different ways of applying your applique, depending on the look you want to achieve.
Let’s have a look at the different types of applique 🙂
Types of applique:
The three most common ways of doing applique are hand applique, fusible applique (or iron on applique) and machine applique.
You can also mix these techniques together to create different effects. I love to combine fusible applique and machine applique together because it allows me to add great details to my designs.
Hand applique
I also love to hand applique. It allows me to work anywhere and to take my applique work with me wherever I go 🙂
Hand applique techniques include:
- Needle turned applique
- Reverse applique
- Raw edge applique
- Felt applique
- Applique embroidery
Needle-turned applique
Needle turned applique is a needlework technique which involves sewing multiple layers of fabric and batting together with thread, generally by hand.
It requires the use of an embroidery hoop to keep the fabric taut so it will not become distorted during construction.
When putting together a needle turned applique, you can find embroidery hoop templates to help guide you through the process.
However, I always do my needle turn applique without a hoop. Here is a step by step tutorial on how to create a beautiful hair clip holder by using applique templates from La Creative Mama Sewing binder.
The basic needle turn applique technique is done by placing the applique piece on the exact position that you want it to be on your base fabric following your marked lines.
Once you have laid your applique piece on the base fabric, you will use your needle to poke through the back of the two fabrics and then gather a few threads from behind.

Then pass the needle from where you originated out again through the front of the base fabric next to your applique piece, and back through the back of the base fabric. Pulling on the thread that you gathered from behind.
Repeat this process all around your applique piece until it is attached firmly to the base fabric.
For more detailed instructions on how to do needle turned applique, follow check out this tutorial for the step by step instructions 🙂
Reverse Applique
Reverse applique is a process where you sew your shapes to the background fabric, turn it around and then come back over it with black thread to give the impression that the shape has been quilted into place.
Many people use fabrics like denim for this technique because of their firm texture and how easy they are to work with.
This is a technique that I don’t use often but I love how it makes your sewing look so professional 🙂
Raw Edge Applique
Raw edge applique is a wonderful technique which involves cutting shapes and sewing them directly onto the fabric.
This is a great way to applique by hand if you are not into perfect edges. I personally really enjoy the raw edge effect and the photo below illustrates a raw edge applique portrait that was made from fabric scraps.
This portrait was created with fabric that was totally upcycled. Some of it was dyed using natural dyes.

NOTE: You can argue that this portrait is under the hand embroidery category but since I have left most of the fabric edges raw they will fray with time.
Felt Applique
Felt applique is a wonderful technique that can create some amazing pieces, especially when you are looking for something soft and cuddly.
You can use any felted fabric but I absolutely love making my own wool felt. It allows me to combine different colors of wool roving and to design the fabric and the flower as well.

I love the idea of using felt applique to make flower designs but there are definitely many other fabulous ideas out there. Here is a link to a step by step tutorial on how to make your own felt applique flowers.
Hand Embroidery Applique
I really love hand embroidery. I use it in raw edge applique quite often to add a bit of texture and also to add some lines where there is none or too little fabric for the needle to pass through otherwise.
Hand embroidering lines on the surface adds another dimension, especially if you have a patterned piece. The photo below is an applique embroidered pillow.

To help you start incorporating hand embroidery into your applique, here are some stitches that I enjoy using:
- Running stitch
- Back stitch
- Blanket stitch
- French knot
- Satin stitch
- Zig zag
- Whip stitch
A running stitch is the easiest and most common of all hand embroidery stitches. It is a very versatile stitch as well, which can be used to outline texture and fill shapes.
The running stitch is also an effective way to add an interest line or even a surface texture. Remember to keep your tension even as you work this stitch!
A back stitch is another common stitch that you will find in many needlework projects. It is a great way to outline shapes, or even add texture around shapes that have been embellished with some stitches.
Blanket stitches are wonderful for adding embellishment or detail where the holes of back stitching can’t be used. This is a stitch that you will see often in free motion embroidery as it makes for a nice line.
A French knot is a delicate little embellishment that I adore. This image shows how a french knot is worked.

To make it before you need to draw a little circle with your needle and then turn the point of your thread back to come out at the top of this little circle. Then pull gently and you have a lovely little french knot!
A satin stitch is a wonderful way to add another dimension to your applique in hand embroidery, especially if you are not using any fabric on the back. Satin stitches are also a really wonderful way to add a bit of texture to your applique work.
A zig zag stitch is a really great way to add interest to a piece, especially if you are adding some hand embroidery to your design. Think about using it on the corners where shapes meet or even at the bottom of a triangle to keep it sitting nicely.
A whip stitch is a nice and simple hand embroidery technique that adds extra texture to your applique work. It takes some practice but once you get the hang of it, you will be able to use this stitch in many different applique projects.
Iron on Applique or fusible applique techniques
This is my favorite type of applique! You iron on your shapes and then sew along the edges. You can use fusible web underneath your shapes to create a bond between the pieces of fabric and have no sewing needed!

Steps in the iron on applique process:
Using Applique templates – In the photo above I used La Creative Mama Template. You could also use one of your own designs!
Cutting fabric scraps – cut out random shapes from your fabric using a rotary cutter, ruler and cutting mat.
Fusible web application – use fusible web to trace the templates and place on top of the pieces you want to be ironed onto the background material.
Check out this video tutorial which shows the process of fusing the templates to the fabric scraps and also applying the applique to the base fabric of a tote bag. You can watch the full tutorial here.
Applique Video tutorial
Best Fusible Web for Appliqué
You will need to use fusible web as your interfacing if you want to iron on the templates or shapes for applique.
The best and most popular is heat and bond (I use the lite strength) because it has a medium bond, it’s easy to work with and also can be used in place of traditional glue stick.
You can also use the strong strength to create a bond with your fusible applique, but make sure you are working on the right surface as this will melt through most fabrics.
Iron on Applique Patterns.
Iron on Applique Numbers and Letters
Here is a step by step tutorial on how to create a beautiful Christmas Advent Calendar by using iron on applique numbers on each pocket of the advent calendar.

Iron on Raw Edge Applique – t shirt
Here is a step by step tutorial on how to combine using an iron on applique pattern onto a t-shirt. Once you wash the t-shirt, the edges will be frayed and it will create a raw edge look.

Machine Applique Techniques
Sewing machine applique is a wonderful technique which can create stunning pieces, it’s quite easy to do once you get the hang of it.
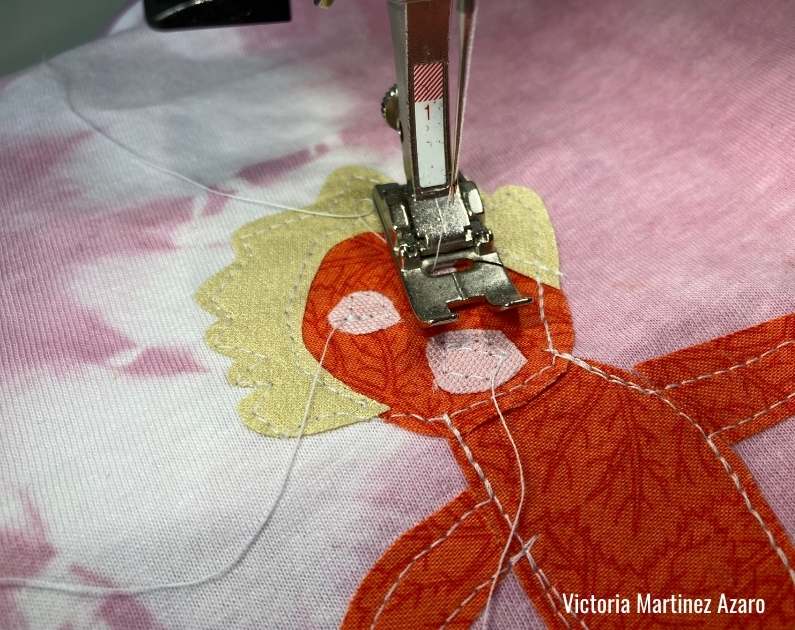
I use machine applique to stitch around my iron on applique fabric scraps onto my base fabric. I like to sew around the design at least once but you can also use your sewing machine to stitch around two or three times to create a cartoon type effect.
The photo below is from a pillow tutorial, check it out!

You can also add design features to the inside of the applique pattern. The illustration below shows how easy it is to add details to the clothing by playing around with the embroidery stitches of my sewing machine 🙂

Applique and Quilt as you go
Quilt as you go is a great way to combine your sewing machine skills with hand sewing details. This is a very popular technique in the quilting world.
I love this technique and I use it a lot. My favorite pillow tutorials which combine quilt as you go with applique are:
- How to make a baby pillow cover tutorial
- How to sew a quilted pillow cover for girls
- How to make an easy quilted pillow cover
Quilt as you go allows you to create a lovely quilted texture for the base fabric and then you can applique either by hand using fused applique or directly on top the the fabric.
One great tip: if you want your applique to be really smooth and flat after washing, put some ironing spray or starch onto the edges.
Frequently asked questions
Can you applique with a regular sewing machine?
Yes you can! I love using machine applique techniques!
Basically what you do is stitch around the edges of the applique with your sewing machine.
Can you applique with an embroidery machine?
Every machine will allow you to stitch around your iron on appliques using a regular stitch or any of the embroidery stitches.
If possible, sew with a zig zag stitch for best results. You can create beautiful designs on cotton shirts and tea towels!
Can you applique without fusible web?
Yes you can create great applique designs without using fusible web! It’s a really great technique that is perfect if you only have scraps of fabric or very little time to get your project finished, it is known as ‘Raw edge applique’.
This photo is an example of sewing applique directly to the base fabric without any fusible web. In this case these fabric books were made by using hand embroidery techniques to create fabric journals.

What are applique scissors?
Applique scissors are little scissors that make it easier for you to cut around small shapes, fabric edges and clip small corners in your project. They are also easier to handle that the regular big fabric scissors.
Final thoughts on Applique
Applique is a great way to use up scraps of fabric and create something beautiful. You can make appliques with lots of different types of fabric, from cotton to silk or wool.
It’s also really easy to learn how to do it—just follow La Creative Mama tutorials and download your FREE Applique Template to get started straight away!
Save this tutorial to your favorite Pinterest Board


I love your page, this is exactly what I have been looking for. I love a primitive look to applique but didn’t quite know where to begin, now I have a set of guides to help.
applique templates