A great system to make the best fabric face masks for your kids!
A while ago I published another tutorial on how to make a fabric face mask with free patterns in all sizes to fit every member in the family. What I have realized since then is that how to wear a mask is as important as the mask itself. Especially when it comes to kids since they are not aware of how contagious the Covid 19 virus is.
They may re use the same mask twice or get the masks muddled up with each other since they all look similar. They may also take the mask off in the wrong way when they get home and expose themselves to the virus. So I have come up with a system to make the best fabric face mask for your kids that will be fun and playful for them to wear :).
My system relies on using a color code, one color for every day of the week or one color for every outing. this color code will be on one side of the mask. So you can still make 20 masks with the same fabric but you just add a little color code to each one and then you determine which color will be worn each day or each outing.

What is the best fabric to make face masks?
The best fabric to use for the face mask is 100 % cotton. Either 100% cotton from a pillowcase, or 100 % cotton t shirt fabric or 100 % cotton shirt fabric. Check out this study which explores the best materials for making DIY masks.
How can you be sure what is the fabric composition of your fabric?
If you are using a garment or a pillowcase the fabric composition label will tell you exactly what the fabric is. Make sure it says 100 % cotton. If you are using a bought fabric you must do a fabric burn test to find out if the fabric is 100 % natural cotton.
Making color coded fabric masks Tutorial
This post contains affiliate links, which means I receive a small commission, at no extra cost to you, if you make a purchase using this link. Please see my disclosure for more details.
Materials & Equipment:
- You need a good working sewing machine
- Fabric To make these color coded face masks you will need 100 % cotton fabric in a variety of colors. This quilting fabric pre cut pack is a great option for this. Make sure you wash the fabric before making the mask.
- Ribbon
- Scissors
- Free face mask pattern
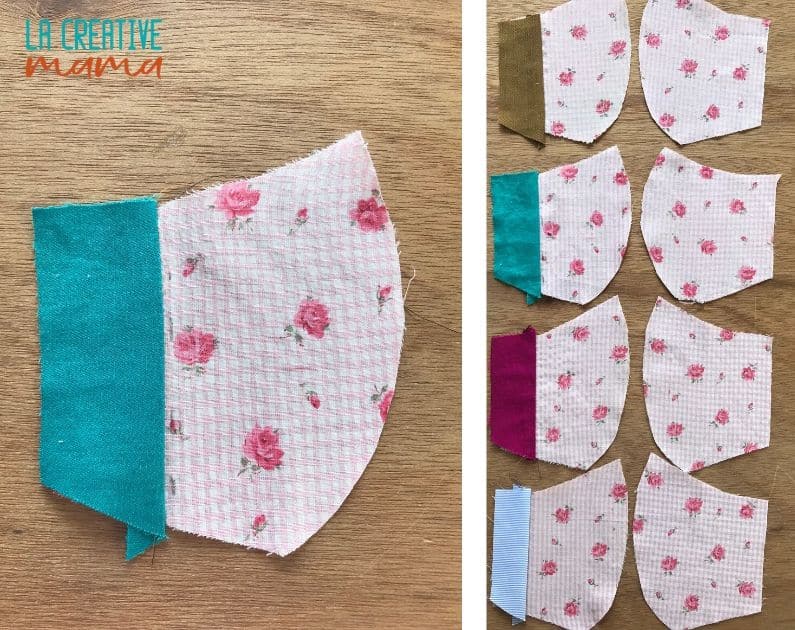
Step 1: Preparing the color coded mask pieces
Download the free face mask pattern. Choose the size. For kids I suggest you stick to Small. Cut around the pattern piece. Place it on top of your fabric and cut around. You need to cut four pieces in total (2 outside pieces and 2 lining pieces). Remember to add seam allowances when you cut your fabric.
On the mask pattern draw a line 4 cms or 1.5 inches away from the side seam. Cut through the line so that you end up with two pattern pieces. You will use these 2 pattern pieces for the side that you are adding the color code. You will only be doing this for the left side of your mask.
Choose many different colors in a similar 100% cotton fabric as your fabric mask. What I have done is make lots of masks with the same fabric and then I only added a small piece of color to color code them. In this way I am only using one fabric and repurposing many different fabric scraps from old projects or old clothes.
For the right side of the mask use the full pattern piece.
Place pattern piece (color code) on colored fabric and cut around making sure to leave the same seam allowance as in your other pattern piece.

Step 2: Sewing the fabric face mask
Place the colored little piece of fabric on the mask piece right sides together. Make sure the sewing lines are meeting by touching each other. Sew in place.

Step 3:
Flip the colored piece to the right side and press. Repeat the process with as many masks as you want to make for the week.
Step 4: Sewing the fabric face mask Video Tutorial
Place your 2 outside pieces and your 2 lining pieces on the table. Pin the curved seam which is center of the mask by placing the good sides together and sewing them in place.
Iron the center seam. This will create a nice finish to the mask.
Now we will sew the inner (lining) fabric to the outer (main) fabric, and attach the ribbons.
Place the ribbons on the four corners, pin and sew.
Place the two masks right sides together and making sure than the ribbons are sandwiched inside as shown in the illustration. Pin and sew all around the mask leaving a 6 cm gap in the lower side of the mask so that the ribbons are able to peak out.
Turn the mask inside out as shown in the illustration.
Now it’s time to close the side of our mask that we left open to turn it inside out. We will do this by edge-stitching around the entire mask. To do this, make sure the open side is folded neatly inside, then edge-stitch around the entire mask.
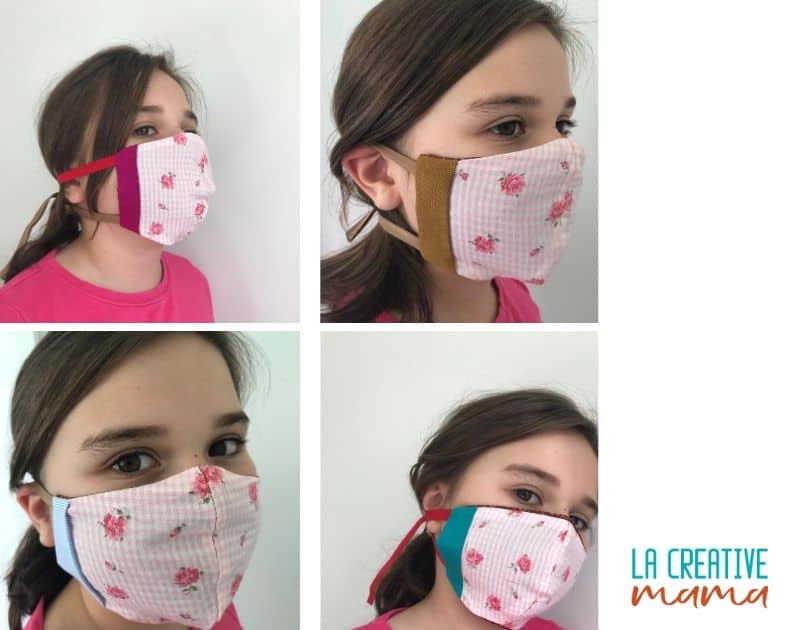
The result:
We made four masks for four outings!
There are a few things to consider in terms of using a fabric face mask. Here are a few suggestions:
- Make enough fabric masks for everyone in your family.
- Color code them so that the kids know to use a different color every day while the other ones are being washed. this will avoid re using an used mask.
- Make sure that you wear a clean fresh mask every time you go out. When you return wash the fabric mask immediately with hot water and soap. Then wash your hands for at least 20 seconds.
- If you have kids get them to place their used fabric masks inside a plastic bag and get them to wash their hands immediately. Take the masks to your laundry area and wash them straight away as well.
- When removing the mask be sure to untie the bottom ribbons first, so that the masks doesn’t fall on your chest
Why can’t I download the pattern? please help
Hi Kate, when you join the form you will be directed to the free resource library. Once in there look for the Face mask pattern and pdf tutorial and then you will be able to download it straight from there. If you have any problems please email me and I can send you the pdf no worries.